HEY EVERYBODY!

I have kind of abandoned this site and I will soon be deleting it. All of my recipes, tutorials, and articles will be transferred over to my new blog, The Om Diet! Basically, it is a new and improved version of this blog with more fitness and nutrition articles and easier, more simplified recipes. It also has a heavier emphasis of weight loss and yoga! But no worries, you will still be able to find my popular recipes for chai, granola bars, coffe creamer, almond milk, biscuits, tea, tortillas, and cacao hot chocolate!

I would really appreciate it if you could take the time to go follow the blog:

http://theomdiet.wordpress.com/

Thanks to all of you and I sincerely hope to continue blogging for your reading pleasure through The Om Diet!

Love and Om,

Sage ❤

Long Time, No See!

DSC_0130


So, it’s has been a while since my last post. The short story is that I have been in the midst of a job change and I haven’t had quite the time I usually do to write and cook! Sad, I know. But never fear! I am coming back shortly and my next adventures will be raspberry pie, spicy kale chips, and blueberry protein shakes! Whoo hoo!!!

Thanks everyone for following my cooking escapades. You inspire me to continue! Also, I am ready to make my next batch of almond milk. I promise to take pictures of the process so that y’all can make it too!

Catch ya later!

Sage

p.s. The picture is of me, being happy because I will soon be cooking again!!

The Making of Simple Biscuits

biscuits

Above are all of the ingredients to create vegan biscuits. The cane sugar is optional, because some may not want their biscuits to be sweet. I chose not to add it to mine, but if I ever want to make this biscuit recipe as part of a dessert I will certainly add a few tablespoons. For a picture of the final outcome, https://tinykitchenette.wordpress.com/2013/02/13/simple-vegan-biscuits/  !

Here’s how I went about it:

biscuits-2

I started by preheating the oven to 450 degrees. Then I began with 2 cups of whole wheat flour, mixed with…


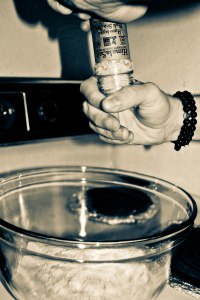
biscuits-3             …1 tablespoon of baking powder and a few shakes of salt.


biscuits-4

I microwaved 4 tablespoons of coconut oil, then added it to the dry mix.


coffee-6

I then added 3/4 cup of raw almond milk and mixed the dough around….

Homemade Almond Milk


biscuits-5

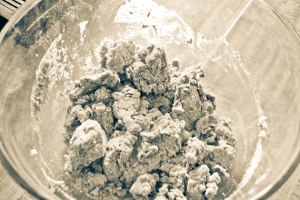
….until it looked like this!


biscuits-6


I kneaded the dough, then rolled it out 1/2 inch thick.


biscuits-7

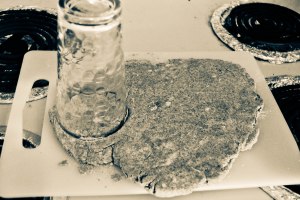
I cut out round pieces of dough using a drinking glass…


biscuits-8         I places all my pieces on a ungreased baking sheet and baked them for 14 minutes.


So easy! Have fun!

A Word on Cacao

Cacao. This stuff is fabulous. While the powder is delicious and satisfies all my chocolate needs, it also packs a pretty serious punch of healthfulness! Consuming cacao can…

…Protect against diseases!

Cacao boasts 4 times the amount of antioxidants than those found in green tea or blueberries. In case you didn’t know, antioxidants are what give human bodies the ability to slow down or even prevent the oxidation of molecules. This is important because molecular oxidation releases free radicals, or cellular byproduct, that can wreak havoc on the cellular structures of the body. By consuming more antioxidants, one can protect themselves against the negative effects of oxidative damage, such as muscle and tissue degeneration, heart disease, diabetes, and cancer.

…Restore A Macro-nutrient! 

Like fats and carbohydrates, protein is considered a macro-nutrient. This means that the body needs fairly large amounts of it in order to function at its healthiest. But unlike fat and carbohydrates, the body does not store protein, and therefore has no reservoir to draw on when it needs a new supply. That’s why we need so much of it! Cacao has protein in spades, with 8 grams per 1 once of powdered cacao.

…Keep Your Bowel Movements Regular!!!

It contains the highest amount of magnesium found in any whole food source .Magnesium relaxes muscles, improves peristalsis in the bowels, and relaxes the heart and cardiovascular system! When I take magnesium, I notice an immediate change in my bowel movements. Magnesium, from personal experience, has worked as a gentle and natural laxative option. By consuming cacao, you can help your body;s process of elimination!

…Help You Lose Weight!!!

Cacao has high amounts of chromium, which helps move sugar from the bloodstream and into cells where it can be used as energy.

…Prevent Cavities!!!

Cacao contains theobromine, which kills the bacteria that causes tooth decay!

Thats all I have to say about cacao for right now, but you should really go try some. I high recommend trying it in hot chocolate form! For my recipe, see https://tinykitchenette.wordpress.com/2013/02/13/the-making-of-hot-cacao/

The Making of Hot Cacao

hot cocoa-8

Yes, not cocoa. It’s cacao! I took the traditional hot cocoa recipe I have been using for years and decided to revamp the ingredients to fit my new and improved (and more healthful!) lifestyle. I used raw, homemade almond milk for my hot cacao drink. If you would like to the same, you can use this recipe to make the almond milk: https://tinykitchenette.wordpress.com/2013/02/11/homemade-almond-milk/

For a picture of the final outcome, see https://tinykitchenette.wordpress.com/2013/02/13/hot-cacao-drink/  !

Here’s how it went down:

hot cocoa-2

In a medium saucepan, I warmed up 1 cup of almond milk.


hot cocoa-3              I then added 1 1/2 tablespoons of raw cacao powder (I used TerrAmazon’s organic cacao powder)…


hot cocoa-4

…1 1/2 tablespoons of cane sugar…


hot cocoa-5

…and a 1/2 teaspoon of vanilla.


hot cocoa-7             I then added a dash of cayenne pepper, Himalayan salt, and cinnamon.

Mix it all up and slurp it all down!

Hot Cacao Drink

Hot Cacao Drink

Very similar to traditional hot cocoa, but BETTER! I used raw almond milk, cacao powder, a dash of cane sugar, a splash of vanilla extract, and just a pinch of cayenne pepper, cinnamon, and Himalayan crystal salt. Sound awesome? It is!! For step-by-step instructions, see https://tinykitchenette.wordpress.com/2013/02/13/the-making-of-hot-cacao/

Ginger Lemon Tea

LEMON-2-2

Simple recipe, amazing results. Whether you drink it hot or cold, this tea will comfort you and warm you from the inside out!

Here’s the recipe:

LEMON

You will need all of the above ingredients. Nothing more, nothing less!

1. Boil 4 cups of water. Add in A LOT of ginger, peeled and chopped. The more ginger you put in, the spicier and stronger your tea will be. I used roughly a full handful.

2. Let the ginger steep into the tea at medium heat for 15 minutes, then squeeze in the juice of two full lemons.

3. Put in 1/3 cup of cane sugar and a few shakes of Himalayan crystal salt.

4. Steep and stir for another 4 minutes.

5. Take off heat, strain out the ginger chunks, and serve! Or, chill in the fridge if you prefer to drink it cold.

Good luck!

Seattle Locals: Wanna Buy Some Chai?

CALLING ALL SEATTLE LOCALS! My homemade Almond Milk and Spicy Chai are now for sale!

Almond Milk (raw, vegan, gluten-free, homemade): Made with organic raw almonds, vanilla extract, cinnamon, and a dash of agave. Free delivery for the local Seattle area. $5 per 32 oz. (1 mason jar) or $12 for 96 oz. (3 mason jars).

Spicy Chai (vegan, gluten-free, homemade): Made with homemade almond milk, organic ginger and spices, brown sugar, and black tea. Free delivery for the local Seattle area. $7 per 32 oz. (1 mason jar) or $18 for 96 oz. (3 mason jars).

Email tinykitchenette@yahoo.com to place your order today!

-Sage, Founder of Tiny Kitchenette

The Making of Raspberry Scones

scone


Above are all the ingredients required to make whole wheat raspberry scones (vegan, of course). The strange, unmarked bottle is vanilla extract. The first time I attempted this recipe, I put too much water in and the scones tuned out flat as pancakes. So don’t use too much water!! I tried again and things went a lot better. For a picture of the final outcome, see https://tinykitchenette.wordpress.com/2013/02/12/whole-wheat-raspberry-scones/ ! Here’s how it went:

scone-6

After preheating the oven to 350, I started with 2 cups of whole wheat flour…


scone-4                … which I mixed with a tablespoon of baking powder…


scone-2        …and two cups of cane sugar (1/3 cup agave or honey works nicely too).


scone-5


After melting it down the the microwave for about 30 seconds, I added in a 1/3 cup of coconut oil…


scone-7

…1 tablespoon of vanilla extract and a 1/3 cup of boiled water.


scone-3

I added a few shakes of Himalayan crystal salt for flavor.


scone-8

Mix it all up into a powdery, dry dough.


scone-9

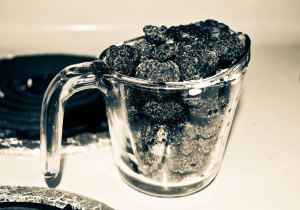
Fold in 1 cup of raspberries!


scone-11

Create balls of dough, using no more than a 1/3 cup at  a time. Glaze with a tiny bit of coconut oil and dust with a sprinkle of cane sugar.


And that’s all it takes! It’s simple and yummy as heck. Have fun!